August 31, 2010

Table for One


With D out of town, camping in Big Sur, I have the whole house to myself.  For 4 whole days.  4 days to do whatever I want, eat whatever I want and finish the pile of homework I have somehow accumulated in the first week of school.  But whenever I'm cooking for just myself, I could care less.  My dinner is usually one of three things; a scrambled egg sandwich, a grilled cheese sandwich or a quesadilla and a big salad.  Sometimes just the big salad.  Or else I space and forget to make dinner entirely because maybe someone got caught up in a marathon TV session, trying to catch up on a whole season's worth in one sitting.  I won't name names or point fingers here, the details aren't important.

In this case, having just been gifted some homegrown tomatoes and corn (picked just hours before eating!) I tossed those together with a few more ingredients to make a fancier side to go with my not-so-fancy tortilla and sharp cheddar cheese.  Okay, it's not a salad revelation, but it's not a pile of lettuce!  And look at those colors!  Clearly I was overeager to eat because I forgot to take the picture until I was nearly half way done with my quesadilla, please excuse the bite marks.  So maybe you're too tired/lazy/underwhelmed by food/zombied out from TV to make dinner tonight, let me recommended this for your meal, it's good for any mood.  Quick, hard to mess up and a nice little celebration of a late summer harvest.

Now, do I have any takers to help me with my homework?


Late Summer Salad

I kept the dressing pretty light here since I wanted to showcase the delicious fresh produce.  The tomatoes will give off their own juices, especially after you salt them, so leave the seasoning until just before serving. 

2 servings

2 medium heirloom tomatoes
1 small ear of sweet yellow corn
a few thin slices off a half a red onion
1/4 of a medium avocado, cut lengthwise into thin slices
1 teaspoon extra virgin olive oil
a pinch of kosher salt
a few good grinds of black pepper

Bring a small pot (one just big enough to fit an ear of corn) of water to a boil and add the ear of corn.  Boil for 5 minutes and remove corn from water, letting it cool.

Meanwhile, roughly chop the tomatoes and put them in a medium sized bowl.  Cut off a few thin slices, however much you feel like really, from the red onion half and rinse under cold water, this will take away some of the bite, and add to the bowl of tomatoes.  Once the corn is cool enough to handle, slice the kernels off the cob and add to to bowl as well.

Just before serving, add the pinch of salt, the black pepper and olive oil and give it a good toss.  Top with avocado slices and serve.

August 26, 2010

A Change of Pepper


I admit, I'm behind on my posts.  There are several entries lingering in my queue, getting pushed further down the list because I get too excited about sharing something shinier and newer.  I'm sure you'd never know the difference if I kept my mouth shut, but this one, if you live in the San Diego area, is a dead give away that it isn't a recent dinner.  You'd be crazy to think I'd crank my oven on to 425F for an hour when the temperature outside is still pushing 80F at sunset.  Absolutely insane.  My apartment doesn't have an A/C or even a ceiling fan in the main room and the kitchen and living room face west, meaning that for a few hours each afternoon it's roughly the same temperature as a sauna.  I don't need the oven to help that along, thankyouverymuch.

We made this the week before we left for San Francisco, when the evenings were still cool and the mere thought of turning on the oven didn't require me to hang out in the house in my bathing suit.  It's from Everyday Food, which I always admire for having simple dinner ideas that are relatively fuss-free and on the healthier side.  Oddly enough before seeing this recipe, it never occurred to me that I could stuff a poblano pepper.  Bell peppers, sure.  Stuff them with couscous, with rice, with vegetables, some ground meat even.  But change the pepper?  Whoa.  Lets say we were just comparing the peppers alone, I'd probably pick the poblano over a bell any day.  They have a nice subtle heat and a kind of smoky flavor when you cook them.  I need to start think outside the box, get out of this bell pepper rut.

Anyhow, these stuffed peppers are tasty.  The baking time here may be long, but the prep work is maybe 20 minutes, well worth the end result.  Melty stringy cheese and cornmeal holds together the chunky filling of beans, corn and onions.  The tomato sauce it bakes in thickens and adds a nice acidity to the creamy slightly sweet peppers.  They make good leftovers, too!


Stuffed Poblano Peppers
Adapted from Everyday Food, April 2008

Mine look a little dry because I seemed to have missed the part about adding the water/broth to the stuffing mixture, so learn from me and don't forget yourself.   Also, look for larger, straighter poblano peppers.  It may take some sorting as a lot of them are kind of kinked, but they will be much easier to stuff without the funny shapes.  These could be tasty served with some sour cream and hot sauce as well.

4 servings

1 can (28 ounces) whole tomatoes in puree
1 minced jalapeno
2 small onions, chopped
3 garlic cloves, 2 whole, 1 minced
coarse salt, ground pepper
1 can (15 ounces) black beans, rinsed and drained
1 small ear of corn, kernels cut off
1/2 cup yellow cornmeal
1 cup shredded pepper jack cheese
3/4 cup water or broth
1 teaspoon ground cumin
4 large poblano chiles, halved lengthwise [stems left intact] ribs and seeds removed

Preheat oven to 425F degrees.

In a blender, combine tomatoes in puree, jalapeno, half the onions, and 2 whole garlic cloves. Puree until smooth. Season with salt. Pour the sauce into a 9x13-inch baking dish and then set it aside.

In a medium bowl, combine beans, corn, cornmeal, 1/2 the cheese cheese, remaining onions, minced garlic, cumin and 3/4 cup water or broth. Season with salt and pepper.

Dividing evenly, stuff the poblano chile halves with the bean mixture and place in the baking dish on top of the sauce. Sprinkle the poblano chiles with the remaining 1/2 cup of cheese. Cover the baking dish with aluminum foil.

Bake until the poblanos are tender, about 45 minutes. Remove foil and continue to cook until the sauce thickens slightly and cheese is golden brown, about 10 minutes more. Remove from the oven and let cool slightly before serving.

August 24, 2010

A Tale of Yellowtail

There's this seafood wholesaler in San Diego that's a total gem of a find; they're open to the public, though they do most of their business with restaurants, and have killer deals on super fresh fish.  I love Catalina Offshore Products.  Most of the really good deals come via their email list and being a member (free!) which is how D and I found out about a recent special they were running on locally caught yellowtail, $4.25/pound.  What?  Sign me up!  Two pound minimum?  No problem, I've got a freezer.  So we called in our order, picked it up the next morning (we called as they were closing) and set forth on a recipe search.  Well, recipe(s) actually.  I'm not very good at improvising recipes with fish, I need guidelines and inspiration.  So what's the first thing I make?

I made...
wait for it....


Fish tacos.  Don't get me wrong, they were tasty, it's just strikes me as a slightly uninspired idea.  I didn't do anything special.  In fact, I was trying to make them as basic as possible since I have a tendency to pile all sorts of goodies and flavors on my fish tacos until I've created a something bursting at the seams and unable to fit into any human mouth.  Cabbage slaw, pico de gallo, chipotle crema, avocados, pickled red onions, cilantro, fish...uh, it's starting to sound more like a salad.  So this is my attempt to go basic.  I grilled the fish with nothing but a thin slick of olive oil, salt and pepper.  And onto the tacos went just the fish, lime crema (sour cream, lime zest and juice), red cabbage, avocado and a sprinkling of chopped onion and cilantro.  I may or may not have added hot sauce at the table.  Around here, that's called simple.


But that was only one half of our fish order.  The other pound of yellowtail went into the freezer while I waited to stumble across something new.  It came a few weeks later when we had this potato and yellowtail dish at a party for D's Abuelo.  Sitting outside under canopies, sipping sangria and wiping our plates clean with bread, it was all so summery and exactly the kind of dish I was looking for.    Since anyone who knows me can tell you I've only recently come to terms with eating leftovers, I waited another week before I made it myself so that it wouldn't feel like I was eating the same dinner too many times in a row.  And you know, it wasn't any more difficult to make than the fish tacos.  Just whip up a simple sauce, half of it becomes the marinade the other the dressing, boils some potatoes and grill the fish.  For all it's simplicity, it's sure a great dish.  The lemon juice and zest gave it a sunny flavor with punches of salt from the briny capers.  The raw garlic in the dressing and the crispy pieces that stuck to the fish were balanced by the earthy greenness from the parsley.  You just can't go wrong putting garlic, lemon and parsley on fish.

And on my gah!  That salad mix up there?  I found it at the farmer's market and it's called Stellar Mix and it truly is out of this world .  There's all kinds of crazy salad greens in there along with big pieces of basil, chives, tarragon, parsley and edible flowers.  I may never be able to eat another mix again.  The watermelon radishes, tomatoes and avocado chunks were my addition.


Citrus Garlic Marinated Yellowtail and Potatoes
Adapted from Relish, June 2010

It could be that since the original recipe was intended to be made with tuna the sauce didn't need to be tweaked, but yellowtail has a darker meat and deeper flavor so I doubled the hot sauce and garlic that it called for so that their added flavor didn't get lost.  The amounts I've listed below are already adjusted.  If you're concerned about the spice level, rest assured with all those potatoes and fish in there, it's hardly has any spice at all.  Also it said the capers are optional, I say they're a must.

6 servings

1 pound yellowtail fillet
1/4 cup olive oil
2 tablespoons hot sauce, I used Frank's Red Hot 
4 garlic cloves, minced
1/2 teaspoon salt
Coarsely ground black pepper
1 1/2 pounds small red potatoes
Finely grated rind and juice of 1 lemon
1 tablespoon drained capers
1/4 cup chopped fresh flat-leaf parsley

Rinse yellowtail and pat dry. Combine olive oil, hot sauce, garlic, salt and pepper in a measuring cup. Pour half the mixture into a shallow baking pan, reserving remaining sauce. Add yellowtail to pan and refrigerate 1 hour, turning once halfway though.

To the reserved sauce add the lemon zest and juice, set aside.

Rinse off potatoes and cover them in a pot with cold water.  Bring to a boil and cook until tender.  About 20 minutes for smaller potatoes.  Halve or quarter the potatoes, to make bite size chunks.

Preheat grill to high.

Remove yellowtail from marinade and place on grill.  Don't worry about drying it off or scraping away any pieces of garlic that may be still be clinging to it.  Grill 4 to 5 minutes per side, until desired degree of doneness. 

Place hot boiled potatoes in a bowl. Break yellowtail into chunks and add to potatoes. Toss with the reserved sauce and capers.  Sprinkle parsley over the top and serve.

August 20, 2010

Watermelon Water


Ouf!  I'm going on a vacation from food.  4 days in the bay area of stuffing myself with ridiculously good food at all hours and all I want are salads piled high with vegetables and handfuls of fruit.  Couple that with the hot weather and I don't think I could eat a full meal if pressed.  But I can't complain, really.  These are what my friend would call princess problems.  We stepped off the plane in San Diego, greeted by the sunshine and a cloud-free sky; the summer weather we've been waiting since June for.  I've been making good on all the summer time activities I said I needed to cram in before school starts back up.  Beach days, pool days, happy hours and leisurely days of relaxing.

But back to the fruit.  When we got back home, I opened my mostly empty fridge to find half of a giant watermelon that I bought the week before we left, wrapped up and begging not to be thrown away.  I should have bought a smaller one for the two of us, but they were on sale and I love watermelon so, I couldn't resist.  So here it was, past it's prime, but not yet going bad, laying abandoned on the chilly bottom shelf and me feeling too guilty to toss it.  I could freeze it and make margaritas with it later (which, by the way, watermelon margaritas are the best!), but I wanted instant gratification.  Why wait for freezing when I can just blend it up and drink it now?  Agua frescas - fresh water or refreshing water for those uninitiated - are pure genius and a perfect way to use up the late summer bounty of quickly ripening fruit.  Can't eat all that melon?  All those peaches, strawberries and cucumbers?  Just toss it in a blender with some water, a squeeze of citrus juice for acidity, a little sweetener and you have the essence of summer in a glass.  It was so tasty that I made 3 more batches.  A whole pitcher to have whenever I pleased, because really, it's practically health food!

And this is how I found myself enjoying the long, late afternoon rays of sunshine, sipping my icy glass of watermelon water, relaxed and glad to be home.


Watermelon Agua Frescas

Up the lime juice or sugar depending on your taste and the sweetness of your melon.  Mine wasn't the sweetest, I'd say it was a medium sweetness, and I found these proportions to wok nicely.  Make it into a cocktail by filling a glass with ice and adding a short of gin or vodka to the mix.  Muddle some mint or basil leaves into it, freeze it in popsicle forms, or just enjoy it as is!

make about 4 cups

4 cups of 1" cubed seedless watermelon*
1 cup water
1 tablespoon sugar
1 tablespoon fresh lime juice

Throw it all into a blender and let it go for a minute (probably less).  Strain it through a fine mesh sieve and discard the pulp.

*I wasn't picking the small white seeds out of my watermelon so there was some of that left behind with the pulp, it didn't seem to affect the juice.

August 19, 2010

A Gastronomic Adventure


Last Thursday, summer school ended.  Next Monday the Fall semester begins.  So, since flights were cheap and our friends are plentiful in the bay area, we booked a last minute weekend trip to San Francisco where we ate and ate and walked around just as much.  Thank goodness for the sunshine in the Mission.


spicy chicken katsu sandwich, 
korean beef sandwich
Rhea's Deli & Market - 800 Valencia Street

mixed salumi cone - mortadella, lonza, brown sugar & fennel salame
Boccalone - Ferry Building

$1 happy hour sweetwater oysters
scrimshaw pilsner
acme bread & butter
Hog Island Oyster Company - Ferry Building

char siu pork belly - grated cucumber, ginger scallion noodles
taiwanese eggplant - 3 types of garlic, hot basil
thrice cooked bacon - rice cakes, bitter melon, tofu skin, leek, black bean, chili oil
ma po tofu - kurobuta pork, fermented black beans, szechuan peppercorns, flaming chili oil
Mission Chinese Food - 2234 Mission Street

eggs florentine - portobello musrooms, spinach and lemon hollandaise, english muffin
small salad
Zazie - 941 Cole Street

violet & cassis and caribbean chocolate macaroons
Paulette - 430 Hayes Street

fresh stretched mozzarella
broccoli raab pizza - caciocavallo, mozzarella, olives, hot peppers
salsiccia pizzas - housemade fennel sausage, tomato, bell peppers, onions, mozzarella
Pizzaria Delfina - 3611 18th Street


salted caramel & roasted banana
brown sugar & malted vanilla ice cream
Bi-Rite Creamery -3692 18th Street

bella donavan drip coffee
stout, caraway and pecan coffee cake
Blue Bottle Coffee - 300 Webster Street, Oakland


Not Pictured:


Dinner @ The Blue Plate - 3218 Mission Street
gnocchi with braised spring rabbit - fava beans, pecorino crotonese, and chervil
southern fried chicken - buttermilk dressing, heirloom tomato watermelon and basil salad

Dim Sum @ Restaurant Peony - 388 9th Street, Oakland

August 10, 2010

Into the Wild


As promised, here's what went down with that last batch of market goodies:
  • The white raspberries, as humdrum as it sounds, were just eaten straight from the carton.  They were too precious and sweet that I couldn't make myself do anything else with them.  Everything you've ever wanted in a raspberry, just a bit tart, juicy, sweet and pleasantly crunchy with seeds you got with these.  It was actually the vendor's first week at the market, and I'm so glad they're staying for a bit.
  • D made some terrific baba ganoush with the globe eggplants.  Not a hint of bitterness and the right amount of smokiness; hooray for super fresh produce!  Since we both have so much free time this summer, he's made it a mission to get more comfortable in the kitchen and start cooking.  So far there has been salsa and this eggplant dip - I call it his blender series.
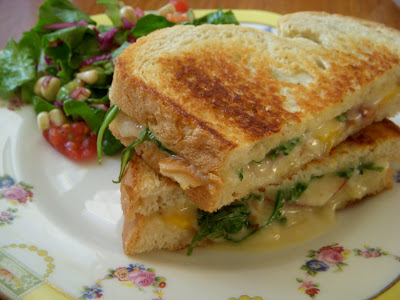
  • The yellow nectarines, well, one of them anyway, were sliced and slipped into the fancy pants grilled cheese sandwich you see above of reserve cheddar, nectarine and wild arugula on sourdough.  Yeah, it was really that good.  And since I'm sure most of you don't need a recipe here's the how to: Lightly butter your bread and layer nectarine, cheese then a handful of arugula and cook (preferably in a cast iron skillet) over medium heat until each side is deep golden brown, on my stove that's 2.5 minutes per side.  Although, I might suggest cooking the grilled cheese without the greens and adding them just as you take it off the heat.  The melty cheese should wilt the arugula once you close it back up.
  • And finally, the real star of my haul, the wild arugula.  If you like spicy salad greens, then you'll love this stuff, it's nothing like any arugula you find in the store.  The small finger sized lacy edged leaves are tender and pack a spicy punch.  Perfect to add to summer salads with stone fruits and toasted nuts, or as is my case, to put atop a rice cake with avocado and sriracha.  Ever since running across this snack idea from Gabi over at Honest Fare I've been smitten; eating it for lunch nearly every day for the past month or more.  For a while I was making it with baby spinach, which was great, obviously, because I ate it like that for three straight weeks, but after making the wild arugula discovery, I am a convert.  The arugula stands up better to the lip burning heat of sriracha and just brings a little something extra to the whole thing.  Also, it was pretty dang good on that grilled cheese.


Rice Cake Snack

If you can find them, I like Lundberg's Sesame Tamari brown rice cakes for these.  Don't worry they're not too salty or even that flavored with the tamari, they're just a little bit more nutty flavored.  I listed Haas avocado in the recipe, because that's the kind you'll find most anywhere, but lately I've been using Reed avocados to much success.

1 rice cake
1/4 of a medium Haas avocado
Sriracha, as desired
1 small handful of wild arugula, chopped

Smear the avocado on the rice cake, then drizzle with as much or as little sriracha as you'd like and top with arugula.  Say hello to your new favorite snack.

August 6, 2010

What I Should Have Done


I have been holding onto this recipe for a while now, as it keeps getting buried under other posts in my queue.  Which after you make this pie, you will understand, is a grave tragedy.  This pie is delicious, all about ripe sweet juicy peaches and peach pie is my favorite pie.  Remember what I said about being a sucker for crumb topping?  This is yet another example of that love.  Alas, this is not only a tale of love, it is also a tale of caution; as in, I need to learn when not to modify a recipe.  Who am I to say Martha Stewart, or her cooking staff, don't know their stuff?  Exactly.  They do.  Martha-1, Me-0.  But even after I stepped over the recipe modification line, this pie was still terrific.  So learn from me, here's what you shouldn't do:

  • When the recipe says to pit and quarter your peaches, do just that.  What I did was I looked at the peach halves, decided they were entirely too large to be cut in half only once more and then proceeded to cut each half into three wedges.  Since the wedges were smaller and the bake time remained the same, what ended up happening was the peaches cooked down and almost melted into the pie.  It didn't come out of the oven looking nearly as pretty as the photo with the recipe, and the pie probably lost some of it's structure.
  • One day I will get it through my head that sour cream and creme fraiche are two different beasts that can't always be used interchangeably.  Don't be like me and just use sour cream here because you already have some at home, suck it up and get the good stuff.  Heck, you can even make your own!  The higher fat content in the creme fraiche will make it set when baked into the pie, like little sweet pockets of cheese.  Sour cream on the other hand breaks and separates.   Again, not the end of the world, and though it did add a nice tang, it could have been so much more.

But it's not all bad news.  There was one change I made, and liked, which was to add 1/4 teaspoon of cinnamon to the crumb mixture, because peach and cinnamon go hand in hand.  It's just enough to notice, but not enough to outshine the fruit.


Peach and Creme Fraiche Pie
Adapted from Martha Stewart

As if the info above wasn't enough, here's one last note.  There's been some debate on whether or not the crust really needs to be par-baked.  Since there isn't a lot of moisture in the filling it could probably go without and the crust shouldn't get soggy.  It's up to you, but I thought I had done enough experimentation as it was, and went with par baking.  And remember, if you use dried beans as weights, you can't cook them after, mind as well toss 'em in a bag labeled pie weights because that's all they're good for now.

1/2 recipe your favorite pie dough chilled for at least an hour in the fridge

Streusel

1/4 cup confectioners’ sugar

1/4 teaspoon baking powder
1/4 teaspoon cinnamon

Pinch of salt

6 tablespoons all-purpose flour 

1/4 cup cold (1/2 stick) unsalted butter, cut into pieces

Filling

1 1/2 pounds ripe (4 to 5 medium) yellow peaches, pitted and quartered

4 tablespoons granulated sugar
Pinch of salt

5 tablespoons crème fraîche

Roll out pie dough to about 1/8-inch thick and fit into a regular (not deep dish) pie plate, 9 1/2 to 10 inches in diameter. Trim edge to 1/2 inch; fold under and crimp as desired. Pierce bottom of dough all over with a fork. Transfer to freezer for 30 minutes. Preheat oven to 400°F right before you take it out.

Stir confectioners’ sugar, baking powder, cinnamon, salt and flour together in a small bowl. Add bits of cold butter, and either using a fork, pastry blender or your fingertips, work them into the flour mixture until it resembles coarse crumbs. Set aside.

Par-bake crust: Tightly press a piece of aluminum foil against frozen pie crust and cover with pie weights or dried beans.  Bake for 10 minutes, then carefully remove foil and any weights you have used, press any bubbled-up spots in with the back of a spoon, and return the crust to the oven for another 5 minutes. Transfer to a wire rack to cool slightly. Reduce oven temperature to 375°F.

Make the filling: Sprinkle quartered peaches with sugar and salt. Let sit for 10 minutes. Spread two tablespoons crème fraîche in bottom of par-baked pie shell, sprinkle with one-third of the streusel and fan the peach quarters decoratively on top. Dot the remaining three tablespoons of crème fraîche on the peaches and sprinkle with remaining streusel.

Bake the pie about 50 minutes. Cover edge of crust with a strip of foil if it browns too quickly. Let cool on a wire rack at least 15 minutes before serving.

August 3, 2010

Giddy Up, Cowboy!


It's only Tuesday, and already I'm thinking about the weekend.  The reality of school starting again and attending full time is just that much closer now that it's officially August and the start of classes is 3 weeks away.  It's planning mode.  Cram as much of summer as I can into the next 20 days.  There are beach days, and mini vacations, and BBQs to attend.  There are afternoon happy hours and pools that I must find.  The next 20 days are one extended weekend and I need to make the most of it.  Because after that, I'm going to be bogged down with Chemistry, drowning in Statistics and up to my knees in Psychology (yeah, I obviously leave all the fun classes for last), and really, that sounds like the opposite of summer to me.

What I can see as being a part of my extended weekend is Texas Caviar.  Oddly named and not fish derived in the least this black eyed pea mixture is also sometimes called Cowboy Caviar - though it's not made from cowboys either.  It's sort of a half pickled chunky bean dip, best scooped up with tortilla chips.  You know, it's one of those casual dips where there are approximately a million variation on the idea, but this is the version I hold dear.  Sometimes there's Italian dressing (erm, no thanks, I don't even keep bottled dressing in the house), sometimes different colored peppers, sometimes corn, but this is the version that I first had, a few Labor days ago soaking in the hot hot sun at the beach, and it's the one I'll probably always prefer.  Heavier on lime juice and vinegar with only a touch of olive oil, smoky depth from cumin and crunchy bell peppers studded throughout.  And don't forget about the freshly minced garlic.  It's like pico de gallo's older hippy sister.  By which I mean it's sort of a salsa, but healthier and more complete.

Now pass the tortilla chips, please.


Texas Caviar

Like I said above, this is the version I prefer but it's by no means the one and only.  Feel free to play around with the flavors; use a different red bell pepper for something a bit sweeter, a serrano (or two) for more heat, add more olive oil. There's just enough liquid after it sits for a few hours that it makes a good dip, but not so much you couldn't serve this as a salad.

makes 4-5 cups

1-15oz can black-eyed peas, drained and rinsed
1 green bell pepper, diced

1 medium (or 2 roma) tomato, chopped

About 4 or 5 thinly sliced green onions
Chopped Cilantro - about 1/2 bunch.
1 minced and seeded jalapeno

2 tablespoons white wine vinegar

1 teaspoon olive oil

2 minced garlic cloves

Ground cumin to taste - about 1/2 teaspoon to start

Salt and fresh ground black pepper to taste
Fresh lime juice, to taste, about 1

Mix all ingredients together and let marinate in the refrigerator for a few hours or overnight.